
 Another week in the books for the 52 Week Anamorphic Cinematography Challenge! This is week four and the assignment was Portrait: Headshot with the instructions being "You shot a selfie, now shoot a "selfie" of someone else!". For this shoot I decided to film outside my apartment building in front of a brick wall that made for a great background. My good friend Ryan McKiernan was kind enough to be my model for this week. This was a great opportunity for me to test out how the anamorphic lens makes skin tones look at a medium aperture. So without further ado, let's take a look at the video for week four! I shot this with my BMPCC in 1080 30P compressed CinemaDNG RAW, 400ASA, 150 degree shutter, with my vintage Kamero 35mm SLR lens at f5.6 with the adapted B&L 2X Anamorphic Projector lens attached.
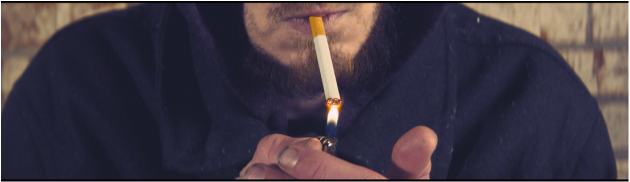
I set up this shot at night so that even though I lit it to be relatively bright, it would still maintain a harsher look lighting wise. I didn't want everything to be evenly lit, I wanted to still have small shadows showing texture and contrast. To light this I used a pretty simple set up. I had two 500watt halogen work lights lighting the scene. One was pretty close to the side of Ryan, so I put up a scrim in front of it to soften that light. The other light was a bit further away and had no diffusion so that it would remain a harder light. For additional texture I decided to have Ryan smoking a cigarette. This added in the texture of the paper, the burning cherry and ash, and then of course the smoke. I also really liked how this shot turned out because it gets a nice sharp shot of him lighting his smoke before tilting up over his face. Right off the bat I knew that I wanted this shot to have the slightly uncomfortable feel of direct eye contact so I had Ryan look directly into the camera at all times. This also fit the requirement (in my opinion at least) of this being a headshot better than if he were to be looking off elsewhere in the frame. This week was also filmed using the FOTGA +2 Macro lens attachment that was used last week to achieve a closer minimum focus distance. I can not say truly how impressed I actually am with this macro lens. It cost me $6 and yet it shoots great, sharp images and doesn't introduce a butt-load of Chromatic Aberrations! A miracle I tell you! Okay enough promoting of the macro lens, onward with the shoot! This did make it slightly challenging to get as much of Ryan's face in frame as I had originally envisioned, but in the end I really like the way that the shot turned out. I was also surprised by how shallow the depth of field was even shooting at f5.6. I did a test shot without the macro lens and the depth of field was definitely far from shallow, so obviously it was due to the lens attachment. But that doesn't change my level of surprise when I reviewed the footage. Now of course the depth of field is still not very shallow compared to if I had shot at f2.8 or had been using a faster lens, but none the less it came out looking really good. I also noticed that when using the macro lens attachment, the background tends to fall off in the focus quickly, but the focus on Ryan wasn't very shallow. His hands and face were at different distances from the camera but were both sharp and in focus. When you look at his torso you can see that it is slightly soft but still relatively in focus until the very back edges of his shoulders. The more that I shoot with this anamorphic lens set up, not only do I fall more in love with the anamorphic look, but I have been more and more impressed by the BMPCC. This camera is phenomenal. The images that come out of it in 1080 are 100% better looking than those that come out of my DSLR. If you are participating in the 52 Week Photography Challenge or are doing your own Cinematography Challenge, please post this week's shot in the comments below!
1 Comment
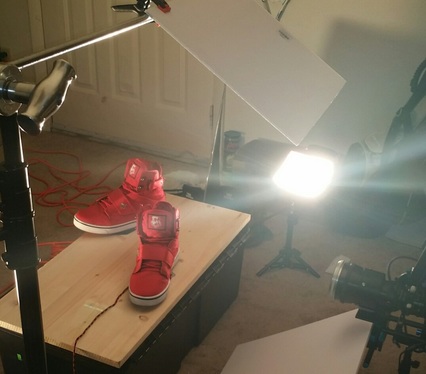 Week 3 of the 52 Week Photography Challenge created an interesting challenge in its assignment. This week was in the Artistic category with the focus on something red. The instructions for this assignment specifically were “Shoot whatever inspires you. Red should be the focus of the image. Don't be afraid to be creative.” I had to think pretty hard on what I could shoot that was red that I felt inspired to shoot. What I came up with was shoes, and not just any shoes, but hightops. For anyone who doesn’t know me, I have a small obsession with shoes, especially when they are hightops. So getting a pair of bright red hightops to shoot consisted of as much effort as it took to walk to my bedroom and grab a shoebox off the shelf. Okay enough gab, let’s check out the video now. Enjoy! I shot this with my BMPCC in 1080 30P compressed CinemaDNG RAW, 400ASA, 120 degree shutter, with my vintage Kamero 35mm SLR lens at f2.8 with the adapted B&L 2X Anamorphic Projector lens attached.
I had two main challenges that I ran into with this shoot:
Due to shooting this in my living room I ran into the issue of reflecting light. This meant that I had some trouble controlling it enough to make sure that the background of the shot would be dark enough that it wouldn’t be obvious that it was in my living room. The other challenge was getting the shoe to rotate smoothly. I don’t own a photography turntable so I found a lazy susan bearing in my random junk bin and rigged it with a section of paracord. I then wound the paracord around the bearing so that I could simply pull it and spin the shoe. This did work, but it took many takes to get a relatively even and smooth rotation. I ended up wrapping the paracord around the lightstand that I had next to me then pulled the paracord. This meant I had to pull harder to get it to move slowly which ended up giving me a smoother rotation. In previous weeks I’ve talked about how it is not suggested to shoot at a low F Stop with this lens setup because some say it will lack in sharpness. I tested this shot in f2.8, 4.0, and 5.6 before deciding on f2.8 for the final shot. I chose this for two main reasons: The bokeh was smoother and the depth of field was more shallow. I got especially lucky for this shoot because I finally got the +2 macro lens attachment that I ordered from FOTGA about a month ago on the day of this shoot. This meant I could get a nice close up for the shot, showing all of the texture on the shoes and getting a nice shallow depth of field. Since the anamorphic lens I’m using has a minimum focus distance of twelve feet, the macro lens attachment that I got moved that to be approximately 2-3 feet away. This made a crazy difference compared to my past shots with this lens set up. It also appeared to make the image slightly more sharp at the lower F Stop. To create an interesting background (and also because I finally had shallow depth of field) I used christmas/string lights on a backdrop stand in the background. This made for the overall image more interesting while also giving it a city backdrop sort of feel. As soon as I set it up, I fell in love with the way that the soft edges of the shoe were overlapped by the bokeh behind them. Next time that I try a shoot like this, I might go for a single bare bulb in the background and utilize the anamorphic flaring that I personally really like. If you are participating in the 52 Week Photography Challenge or are doing your own 52 Week Cinematography Challenge, please post your shot for week 3 in the comments below! To see every week's subject and instructions make sure to check out the Dogwood Photography blog post. 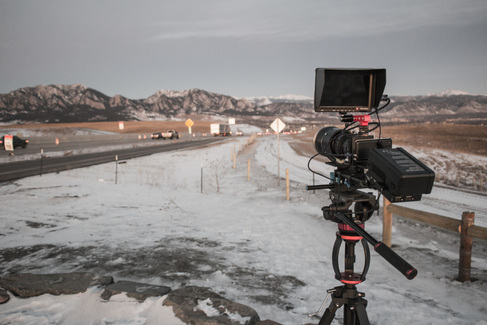 Ahhh, an assignment that I was excited for right off the bat. For this week, I didn't even have to think to know exactly what I wanted to shoot. Living in Colorado we have so many different beautiful landscapes, but this was one that had been calling out to me for a long time. This shot looking out at the mountains was done from a scenic overlook just before entering Boulder Colorado. I shot this early at 7:20 in the morning, but I got there at 6:50 which was the biggest difficulty in and of itself. The car thermometer said it was 38 degrees out so not too cold, until I found out what my real challenge for the day was....wind. It was so windy I could barely open the car door. But who cares about the weather right? So anyways, on to the video. You can view the clip for this week below: This was shot on the BMPCC in 1080 24p Compressed CinemaDNG RAW, 800ASA, f18, shutter at 180 degrees.
For this shot I decided to use my Canon nifty 50 (Canon 50mm f1.8 for those unfamiliar) with the B&L Anamorphic Projector Lens. I chose this lens for it's focal length, sharpness, and focusing past infinity. This ended up being a great lens choice for focal length and provided a great learning opportunity for me. Normally I just use it at f1.8 on the BMPCC because I don't have an adapter that adapts electronic functions. This means that the iris is always stuck all the way open. That is unless you remove the lens from a Canon camera (such as my DSLR) while in aperture priority mode. This was fantastic as it let me set the lens for my desired F stop of f18. I shot at f18 to get a nice deep depth of field to really show off all the different edges and peaks to the mountains. I wanted to get all of the details without losing anything into blurry backgrounds. The hardest thing for this shoot was really just the wind. If there had been no wind then the only big challenge would have been how to capture the mountain range. But the wind was so bad that I couldn't even get a steady shot despite being on a tripod. Since the wind was blowing away from the mountains, it was blowing directly into my camera. No matter what I tried, I could not get the camera to remain 100% steady unless there was a lull in the wind. The reason this shake was so noticeable was due to the fact I was shooting on a 50mm lens. On most cameras that would still be wide enough to not be too noticeable, but on the BMPCC it is the equivalent of approximately a 144mm lens. Without image stabilization in lens (which of course the nifty 50 does not have) the image then would shake in the background with the smallest of movements of the lens/camera (outside of slow panning/tilting of the tripod head). So to fix it as best as possible I utilized stabilization in post using Warp Stabilizer in Premiere Pro CC. Despite best efforts there was still a bit of shake noticeable in the video. The video was also sped up to fit into the 15 second time limit that I set for my challenge. This in someways hid the shakes and also made them more obvious. All in all I'm happy with the way that this week turned out overall and I look forward to the weeks to come! If you are participating in the 52 Week Photography Challenge or the 52 Week Cinematography Challenge, please share this week's shot in the comments section below, or on our Facebook page at facebook.com/AlanMeyerVideo and be sure to like our page! 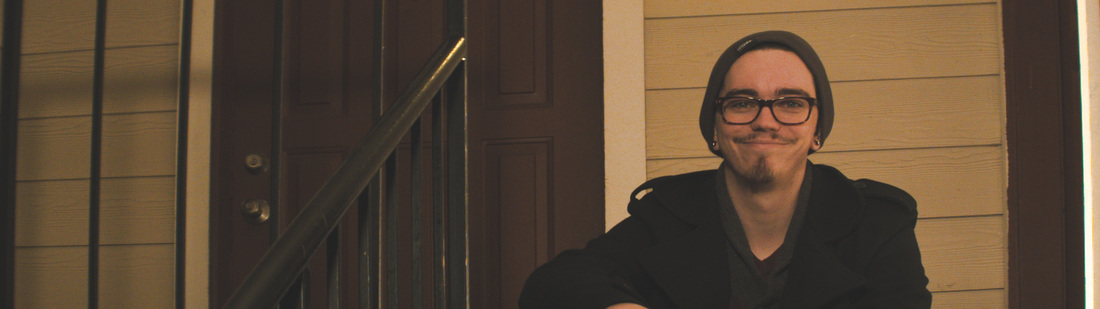 This week marks the first week of my 52 Week Anamorphic Cinematography challenge. The assignment for this week was a self portrait, which is the one I was dreading the most so it's great that I get to knock that one out of the way right of the bat! For those that are following the 52 Week Photography Challenge that are confused as to what version of the challenge I'm referring to, please check out our last blog post describing the challenge here: My Adapted Anamorphic Challenge Enough with the shameless self promotion, let's get on with it! So where was I? Oh yes, self portrait. For my video self portrait I decided to set up right outside my apartment building on the steps in the evening. I like night exteriors generally, and the high contrast light of working in the evening sounded like a fun start to my anamorphic learning curve. Here is the video: This was shot on my Black Magic Pocket Cinema camera at 1080 Compressed CinemaDNG Raw, ASA 800, 30FPS at f5.6. The lenses used were the vintage Bausch & Lomb 2X Anamorphic project lens and a vintage Kamero 35mm FD Mount SLR lens. I lit the scene with a combination of existing light in the stairway, two LED's and two 500Watt Halogen work lights. My first biggest challenge with this was determining at what F stop to shoot. Normally, I tend to go for the lowest F Stop possible in this type of shooting situation for a nice and shallow depth of field. But this isn't really possible with the anamorphic lens to achieve a sharp image. Most reviews online from people using similar systems suggest always shooting at a minimum of f8.0 for a sharp image. I decided to experiment a bit though and only go to an F stop of 5.6 for this shot. Due to the need to shoot at a higher F stop, it forced me to really take in the surroundings for the shot since there would be a deeper depth of field. This is why I decided that I would shoot in the stairway of my building. I thought that it would be a good location due to all of the lines present in the scene, from the vertical railing bars to the horizontal lines created by the siding. Another difficulty with shooting this was the large minimum focus distance of this lens set up which is about 12 feet. This was difficult to achieve simply due to the lack of distance between the top of the stairs where I sat and the landing where the camera was placed. This week, although challenging was fun but I'm glad to have it over with. I'm excited for the weeks to come where I get to be behind the camera rather than in front of it! If you are participating in the 52 Week Photography Challenge, or have decided to also do a cinematography version of the challenge, please share your self portrait in the comments below! 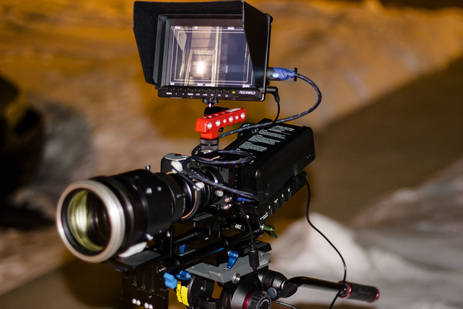 I read recently about a very interesting challenge, the 52 Week Photography Challenge (for anyone bad at math, that's a year). My first thought was "Well that sounds fun, I like to shoot photography." Although the relationship between photography and cinematography is quite close, there are obviously still differences. Sure, shooting photo's would still be helpful in keeping my passion flowing and helping my level of expertise as a cinematographer grow, but it gave me an idea that sounded even more challenging!
Recently I purchased a vintage Bausch and Lomb 2X Anamorphic projector lens that I in turn adapted to shoot anamorphic footage with. As I am new to anamorphic filming in general, it is going to be a huge learning experience overall. So that's where the idea clicked. My 52 Week Photography Challenge became the 52 Week Anamorphic Cinematography challenge! The original challenge (that I found) was created by Dogwood Photography. More information on the challenge as well as each week's subject matter can be found on their website here. What my challenge will be is to follow all of the same subject matter outlined, but I will be filming video with my anamorphic setup instead of stills. This obviously entails certain differences so here are the basic changes/rules that I will be following:
If you decide to also try this challenge, please share your work each week in the comments section for that week! I hope to see many more people join me in this challenge! |
AuthorAlan Meyer is an experienced cinematographer, but is no stranger to writing. Archives
June 2016
Categories
All
|
 RSS Feed
|
|
|