
|
The process of creating a film requires a lot of different tools. You need a camera, sound equipment, sets, costumes, makeup etc. But arguably one of the most important tools for any filmmaker is lighting.
Good lighting is key to making a film look good and be pleasing to the eye. Bad lighting instantly pulls the viewer out of the film and sends them right back to reality. To create that great sense of suspension of disbelief you really do have to have great lighting. The hard thing about lighting for film is the cost associated with lighting equipment. To buy great film lights like Arri brand lights, you have to have quite a bit of dough to spend. Renting is always an option, but even then, that can be pricey for independent filmmakers working on a micro-budget, or no budget film. So this is where a lot of people make excuses. I’ve even been guilty of it, saying “oh I can’t do this project right now because I just can’t get the proper lighting for it.” Well, that’s a load of crap. There are always options. Change the script to use the lighting you have. Or go the low budget lighting route like I have. Low Budget Light Options First there are a lot of options for low budget film lights that you can buy. Whether you are shooting no budget films or low budget projects, having affordable lights always serves a purpose. Even if you are on a shoot that is using the highest end lights on the market, things can go wrong. Somebody might break a light (and be kicked off set for being an idiot). Well, then all of a sudden your “outside of the box” lighting saves the day with low budget light fixtures! The prices can range from very little to still kind of pricey, but there are plenty of options for people of all budgets! They include:
You can find sets of fluorescent lights that come with stands, bulbs, and softboxes for around $200. These are great for shoots in controlled environments for projects like corporate videos, interviews, or any type of film that simply needs soft light to fill the room. I purchased a set of these and they have been a fantastic set of lights for a lot of different uses. Fluorescent lighting kits are great, but they aren’t that bright. If you need really bright lighting for projects outdoors, or where you are working in a darker/larger space that needs a lot of light, these may not be the best choice. You can find light fixtures for $50 or less that are 500watts per light. Another benefit to these lights is that they run generally cool. I say generally because after they have been on for a while the bulbs do get somewhat hot but only take a minute or two to cool down. This is great when you are working in a small space as they won’t heat up the entire room. They also consume very little power so the odds of blowing a fuse with these is very slim. Generic LED Lights These lights are great for so many reasons. First of all, you can get smaller on camera LED lights off of Amazon for around $30-35 each, or there are kits of two lights with mini stands that run about $70. These lights have served as great lights for on camera lighting or small portable fill lights. They have a quarter twenty hole in the bottom so you can mount them on light stands with threaded tops, cheap tripods, or my favorite use, on monopods. By putting them on a monopod you can have someone hold the light on moving subjects from just about any angle. This is especially great because you can then avoid the “on camera news interview” look by having the light held up, slightly to the side, and pointed down at the subject. These lights can be powered by AA batteries, Canon batteries, or the always popular Sony F550 and F950 batteries. Although name brands of these batteries are not cheap, the generic versions available on Amazon are affordable and work very well. These lights are small so don’t expect them to light an entire dark room. They work well for adding additional light into a scene or lighting a subject in a darker place where the subject being lit matters more than the surroundings. Halogen Work Lights I bought single lights that are 500watts each for $13 per light that can be found here [http://www.lowes.com/pd_458096-49296-FU2202_1z0vgb1__?productId=50056891&pl=1]. These are absolutely fantastic for shooting outdoors or indoors and even have a centered hole in the bottom of the stand that works great for mounting onto a lightstand with a threaded mount on the top. This only requires that a wing nut be used to hold the light head onto the stand. You can also get the version that comes with a stand for $25 each like this one [http://www.lowes.com/pd_458095-49296-FU2402_1z0vgb1__?productId=50056889&Ns=p_product_price|0&pl=1]. I will say, as nice as it is that these come with stands, buying low cost actual lighting stands are not expensive and are worth having for other purposes other than just holding lights. The one thing to keep in mind with these lights is that they are hot lights. Unlike film lights, these also do not generally have a fan built in so they get hotter faster and stay hot. Cooling them off after you turn them off is not a fast process either. This means that you have to expect that any room you are filming in will get very hot and when you are ready to take them down you have to plan for cooling time. Clamp On Work Lights Now for my favorite low budget lighting option, clamp on can lights! They are work lights that come in different sizes with different maximum watts. I went with the 300watt lights as you can then put in lower watt bulbs if needed but can go up to 300watts. They cost about $12 per fixture and bulbs have to be purchased separately. My only issue with these is that mounting them can be a bit of a pain. First of all, the clamps don’t hold on to certain materials very well and need a lot of grip. Second, they are rotatable but the small “ball” head that allows them to rotate doesn’t grip very well so they don’t always stay pointed where you want them right out of the box. I found to fix this that a small piece of grip tape wrapped around that “ball” head made the grip much better. In a tutorial that will be coming soon, I will show a simple and affordable design for making better light mounts for these lights. Tips For Utilizing Unconventional Lighting Many of the unconventional lights work well in the sense of flooding a scene with light, but that’s about all they will do. Having control over the light using only the fixtures is difficult as they don’t have barn doors and adding barn doors would require actually designing and making them custom. So what are some great and affordable ways to control the light? There are actually a lot of options from actual production accessories to unconventional products. You can utilize:
Foils & Matte Board These are essential tools for blocking and shaping your light. You can utilize black cinefoil which is quite affordable and is an essential accessory in even the highest level grip’s tool bag. This works great for unconventional light fixtures because it can take any shape. You can use it to then funnel your light and create more of a spotlight effect rather than flooding. If you don’t have the money or are in too much of a rush to order cinefoil, you can always substitute it with standard tinfoil. The bonus (or downfall depending on how you use it) to tin foil is that it is also reflective. This means that if you are using it to funnel light it will shape the light really well. If on the other hand you are using it to block light then not so much. If you need to block light, a great option is black matte board. It’s relatively cheap for large pieces at art supply stores and is very good for blocking light due to its density and general rigidity. You can clamp it to C-stands or light stands and block your light from spilling through the whole room. Reflectors, Walls, & Foamcore Whether a project is low budget or big, bounced light is used very often. Bounced light becomes especially helpful when you are working with unconventional light fixtures that are basically just flood lights. By bouncing the light off of another surface it becomes softer and more diffused and creates a more aesthetically pleasing light. For bouncing light we can’t all afford to run out and get those huge panels you see utilized by big budget movies. So for us low budget folks, there are plenty of options. First is to get photography reflectors. You can get low cost reflectors off of Amazon for about $20 apiece and buy a few. These are fantastic as they have white, gold, and silver. The white creates nice and soft light, silver makes bright and cool but slightly harsher light, and the gold warmer. The next option is to use the walls of the scene. You can just point the light into the wall and let it reflect back into the scene. This generally works best when the light is pointed upward from a lower mount bouncing the light in a way that it will cast down onto the actors. You can also build your own solid reflectors using low cost particle board and paint. The reason that these reflectors are great is that you can make them as big or small as you want and the particle board is very affordable. Finally, an essential low budget tool is white foamcore. It’s cheap, rigid, and makes for a great bounce card. You can get them in a bunch of different sizes and clamp them onto just about anything and get light bouncing onto your scene. Bounced light is also effective if you don’t have any light fixtures and are shooting out in daylight. Shower Curtains & Other Diffusion Diffusion is essential. It makes light pretty. Really it does! There are tons of options for standard diffusion that aren’t that expensive, but it can depend on the size that you need. If you want some larger options, that’s where the price can go up quickly. If you want a large diffuser that can have multiple fixtures behind it you can always use a frosted shower curtain. You can hang it on a backdrop stand and be up and running in no time. The best part is that you can get them for less than ten dollars in plastic or fabric depending on how much diffusion you want. Another option is to use cheap white bed sheets. You can pick them up online or at your local Walmart for around $10-15. These work well for diffusion or soft bounced light as well and can be set up using cheap backdrop stands with some clamps. Remember those low priced reflectors that we talked about earlier? Well here’s another reason to buy them. You can remove the reflector and inside is a great scrim. You can clamp these onto stands or use them handheld and create beautiful soft lighting. Finally there is always diffusion panels for fluorescent light fixtures. You can get these for relatively cheap prices at hardware stores and they work well because they are plastic and mostly rigid. This makes them easy to clamp onto stands, or you can always build cheap frames for them as well. What I like most about the fluorescent light diffusers is the patterning. This really helps to break up the light and give it an even spread. Also these are good if you don’t necessarily want to make the light too soft, just spread it out more and cut down the harshness. Great Lighting Doesn’t Have To Be Expensive Creating good looking lighting takes skill but it doesn’t have to require a huge budget. By using some of these low price options for lighting you can create great lighting for basically any type of video. Just remember though, showing up to a paying gig for a client with unconventional lighting may not always go over that well with the client depending on the type of video you will be making.
0 Comments
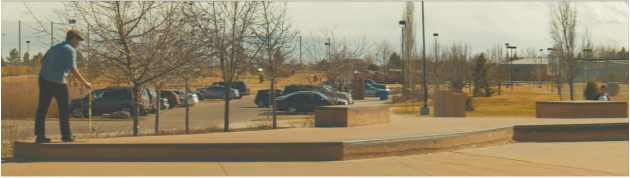 This week's portrait was one that I shot a couple weeks ago in preparation for this week. The description for this week's challenge was this: "Show a subject in their natural habitat. Their place of work or hobby is a great start. Tell their story with the environment"I shot this while I was hanging out in Fort Collins Colorado at a local street skatepark. For those that don't know what that means, it is a dedicated skatepark but instead of ramps it consists of stairs, ledges, and handrails. I figured that if I should show someone in their "natural environment", what better place than a skatepark? So I rolled up there and watched some of the people skate for a bit to see if there was anyone that was any good. There was a group of dudes hanging out skating that were pretty decent, so I asked if I could film them skating and after an hour of filming, had some good shots but none of them actually landing tricks. Since they weren't landing tricks, I just found the one shot that was at least the most interesting and included the best failure. Alright, so let's go ahead and watch the video! In the end, I shot this with my BMPCC out of sheer curiosity. I wanted to see how it handled action sports when shooting at 30fps. Looking back I kind of wish that I had instead filmed on my DSLR at 60fps.
Although I would have had to settle with shooting at 720p instead of 1080, it would have stretched to a nice looking 1080 when stretching for the anamorphic. So the full details for the shoot were that I filmed in 1080 30P compressed cinemaDNG RAW at 200ASA, 15 degree shutter and at f8.0. I shot this using my B&L Anamorphic projector lens on my Sigma 18-50mm lens. There were a few guys going for different tricks so it was a bit difficult deciding on which trick to use. I liked this shot because it starts out with the skateboarder very focused on the trick he is about to attempt. This was the portrait of the whole shot. One of the biggest challenges that I ran into while shooting this was finding a good focus point. Since I was shooting at a relatively high F-stop, I had the advantage of deeper depth of field, but the distance that the skaters were going was far enough to range just slightly in focus. The issue that I have had is that with the minimum focus distance being so far, and the lens I was using have such a small range between infinite focus and 12 feet away, it was not working well when I pulled focus while they skated. So instead, I focused at the middle point of the distance they were skating and for the most part they stayed in focus, but they got soft at the start and finish of the shots. Despite this, I still really like how the shot turned out. The other difficulty that I had was keeping a steady shot. The lens was getting some jittering motion when I would first hit record and hit to stop recording. This made timing a bit difficult if I was hurrying to capture a trick as the camera would continue its shake as I started panning the camera. This is an issue that I have been working on correcting for a while now and I hope to find a solution to implement soon. In the end this was a good learning experience that although I really do love shooting on the pocket cinema camera for its dynamic range and image quality, it is alas no match for action sports. If you are participating in a photography or cinematography challenge, please make sure to share you shots in the comments below and come back next week! 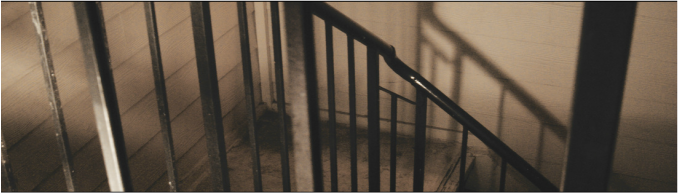 Week 9 is in the bag! I have to say, this one was actually a little bit tough. The subject was artistic choice with the subject needing to involve shadows. This was just kind of tough because I had a lot of different ideas, but couldn't decide on which one I liked best. Then I honestly just procrastinated and after everything that I had left to do with my crazy schedule this week, I had to figure out something cool to shoot very much on the spot. That's when it hit me...stair railings! The stairs outside of my apartment are horrendously designed in regards to moving anything bulky up them, but for creating shadows? Pretty perfect. They have metal a metal handrail with lots of bars to create shadows and the stairs are a square "U" shape. This allowed me to set up a 500watt work light to blast light through the rails and create shadows on the walls and steps. So that's enough talk, let's watch! I shot this with the BMPCC in 1080 30P compressed cinemaDNG RAW at f8.0, a shutter angle of 360 degrees, 800ASA, and I used my Sigma 18-50mm lens with the B&L Anamorphic.
The hardest thing about setting up this shot was lighting it. I set up a 500watt work light to have a nice bright warm light source as the light making the shadows. I then set up a continuous 4 bulb fluorescent light with a softbox for a bit of cool light. This was really just to cool the light on the metal rails closest to the camera so that they wouldn't be as warm. I wanted this look so that the highlights would be relatively cool but maintain the warmth of the shadows as they got darker. I decided to go handheld for this shot so that I could adjust the camera position in both height and side to side movement. I didn't want to be limited to rails with panning and tilting. I wanted to be able to compensate for a tilt with the distance between the camera and the ground. The other reason that I liked this shot was from all of the lines created in the image. There are the bars on the railing, the siding of the building, the stairs, and the shadows all creating different lines in the image. I shot this at the widest focal length that the lens allows without vignetting which is about 32mm. The other thing that this did that I actually really like is create slight lens distortions that are visible in the different lines. Since the projector lens is not meant to be used at wider angles it does get noticeable image distortion unlike high end anamorphic cinema lenses. For the purpose of the shadows I decided to really compress the color of the image to each end of the spectrum making the shadows darker and the highlights brighter. Since this was shot handheld, I decided to shoot at 30fps to have the extra data to better be able to add some stabilization in post. This gave it just a bit more of a smooth handheld motion rather than jittery/shaky. Since I shot it exposed more to the left, the color grading led to a slightly noisy image so I also dropped the vibrance down to zero. This takes the color out of the noise which lets the grainy noise of the BMPCC shine. With all of the color of removed from the noise the BMPCC has a nice grain look rather than the ugly noise seen in DSLRs that commonly have the issue of artifacts. So like always, if you are participating in a 52 week photography challenge or cinematography challenge, please share you shots in the comments below! 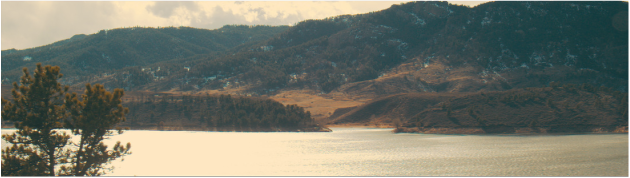 This week's landscape timed out perfectly with my random moods to go places! So as it happened, I took a little day trip to Fort Collins (only a 45 minute drive from where I live) for the sole purpose of getting out with my camera and filming. While I was up roaming around, I decided that I wanted to get some footage up at Horsetooth Reservoir and there ya have it folks...this week's shot! I got really lucky when I went to the Reservoir to film because just before I got to where this was filmed it had been quite overcast. But luck has a way of finding those that need it and the clouds cleared up enough to let through some sun! So let's go ahead and watch this week's video then we'll talk about how it was filmed. Yet another week that I decided to film with my BMPCC! I shot this in 1080 30P with compressed cinemaDNG RAW, a 15 degree shutter at 200ASA and my iris set to a nice f8.0.
To start I have to say I do like how this shot turned out a lot, but hindsight being 20/20, I do wish I had used a circular polarizer to reduce some of the sun's glare on the water and make the clouds pop a bit more. There were two major challenges that I ran into while filming this. The first was just getting to the location. As it would turn out, all of the places that I used to be able to easily park around the reservoir all require a parking pass now. Lame. Now I'm not saying that I parked there without a pass....but I'm not NOT saying that I did. I plead the 5th. But once I was able to get parked I decided that maybe I would go for a quicker shoot and go handheld rather than on sticks. This ended up being a great idea anyways because of challenge number two. The wind was picking up while the temperature was dropping so I didn't feel up to staying at one spot very long anyways. The wind caused issues for shooting handheld though because no matter what I did I couldn't stop myself from swaying which obviously then translated into the footage. I tried everything, squatting down, leaning into the wind, using rocks as stabilizers, but all to no avail. Luckily I was being smart and shot at a higher frame rate and shutter angle so the footage did very well with some stabilization added in post. This also ended up being a small blessing in disguise actually! When I filmed this I shot it with my lens at about 30mm. While there was no visible vignetting from the anamorphic lens that I saw at the time, it turned out that one corner did show some vignetting. The sun was coming in at just the right angle that it reflected on the barrel of the anamorphic lens causing only one corner of the frame to have a very light vignette protruding in. That's where the stabilization helped because it of course cropped in ever so slightly which was just enough to hide the vignette. Now my favorite part of this shoot was the color. The way that the mountains, trees, and water all came out with a bit of color grading just made me giddy. What can I say, I'm a sucker for color grading. I just love how the image can have such nice areas of warmth and coolness all in the same image without clashing. Just great really. Well that's about all I have to say about this week! Make sure to share your images or videos for this week's shoot in the comments below! 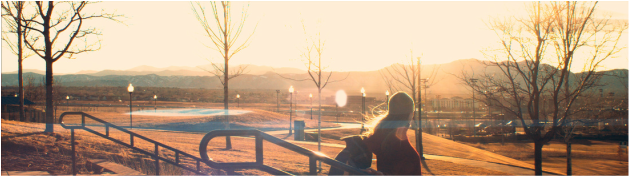 Time for another week of the Anamorphic Cinematography Challenge! So the assignment this week was to do a portrait without showing the subject’s face. This type of shot is actually one of my favorites. There are so many different ways to film someone without showing their face while still expressing a story. You might simply shoot from the back of the subject, you can have them looking away from the camera at something in the background, or their face can actually be hidden by an object such as something they are carrying. For this shot I knew right off the bat that I had to incorporate movement. Whenever I film a faceless portrait type of shot I always like it to be moving. I also have a tendency to shoot this type of shot for slow motion...so that’s what I did for this one! WOOOO! SLO-MO! Without further ado, let us watch! I shot this on my BMPCC once again (I only keep specifying because I’m sure at some point I’ll end up busting out my DSLR).
It was filmed in 1080 24P compressed CinemaDNG RAW, 400ASA, 180 degree shutter, with my vintage Kamero 35mm SLR lens at f11 with the adapted B&L 2X Anamorphic Projector lens attached. The location where this was filmed was one that I’ve had in mind to film at for a while. This week’s subject matter simply stood out to me as a great time to film at these stairs. I like this spot a lot simply because it is a huge set of stairs. This makes for a great background while also creating a lot of motion in a short distance. Because of all the options that this location provided, I ended up shooting a few different shots of varied motion. The motion varied in both how my subject moved, and how/where the camera moved. The biggest challenge of this shoot was the camera motion. This was the first shoot with the anamorphic lens set up in which I went “hand-held’. In order to get a smooth shot for this I decided to utilize a monopod to move my hand away from the camera. This is also one of my favorite riggings because it makes it easy to get great low angle shots by flipping the camera upside down...which is exactly what I did. One thing that I have learned about this system for filming is that in order to get footage that looks stable, I have to have any support being used mounted directly under the lens currently. This is because due to the specialized mounting that I have set up for this adapted lens set-up, there is a mounting point directly under the lens. This basically mounts the lens directly to the support and the rest of the rail system is attached to that mount. I then did the best I could to balance the camera rig on the monopod to create the most stable shot that I could. One other difficulty to add into the challenges section was my brain. I forgot that I wanted to shoot this in 30P for easier slow motion and shot it in 24P. This was therefore a bit more difficult to work with in post, but I made it work. My favorite aspect of this shoot was actually the wind. I hate wind in general, but it made for a nice effect in the video. At first I was worried that the direction that the wind was going wouldn't work well for the shoot, but it ended up coming head on just like I wanted. Thanks Mother Nature! Overall I'm really happy how this shot came out despite the fact that things could have gone better. Again, please share your images or videos here in the comments if you are participating in the 52 week photography/cinematography challenge! I would really love to see some other cinematographers out there joining in! |
AuthorAlan Meyer is an experienced cinematographer, but is no stranger to writing. Archives
June 2016
Categories
All
|
 RSS Feed
|
|
Thornton CO, 80233
alanmeyervideo@gmail.com |
|